

Good content takes time and effort to come up with.
Please consider supporting us by just disabling your AD BLOCKER and reloading this page again.


Hola! Let's integrate the SummerNote WYSIWYG text editor for our HTML textarea.
What we will cover in this article
NOTE: Code available in GitHub @ SummerNote WYSIWYG Editor
I highly recommend SummerNote because of the following advantages
base64 encoded and will be saved to your database, off-course you can make it to save to the specific pathI will use CDN (Content Delivery Network) instead of downloading and placing them in my HTML file. But if would like to work offline then please go ahead and use the URLs to download the content and save them with respective file names.
CDN / Download URL - jQuery CDN
CDN / Download URL - SummerNote JS
CDN / Download URL - SummerNote CSS
CDN / Download URL - SummerNote JS
CDN / Download URL - SummerNote CSS
In the following HTML file structure, I am using SummerNote lite version without any framework
<!DOCTYPE html>
<html lang="en">
<head>
    <meta charset="UTF-8">
    <meta name="viewport" content="width=device-width, initial-scale=1.0">
    <title>SummerNote Demo</title>
    <link href="https://cdn.jsdelivr.net/npm/summernote@0.8.18/dist/summernote-lite.min.css" rel="stylesheet">
</head>
<body>
    <!-- Your HTML Body Goes Here -->

    <script src="https://code.jquery.com/jquery-3.4.1.slim.min.js"></script>
    <script src="https://cdn.jsdelivr.net/npm/summernote@0.8.18/dist/summernote-lite.min.js"></script>
</body>
</html>
Let's instantiate the textarea with summernote js
<div>
    <label for="body">Body</label> <br>
    <textarea name="body" id="body" rows="10"></textarea>
</div>
Make sure to add id or class attribute for textarea as we will be using the same to instantiate the same for summernote
<script>
    $(document).ready(function() {
        $('textarea#body').summernote({
            height: '300px'
        });
    });
</script>
And you will be able to see the following default textarea converted to very beautiful WYSIWYG editor as follows
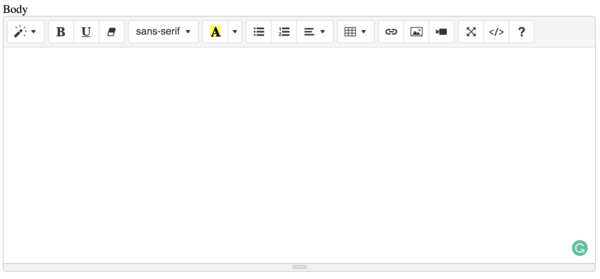
SummerNote Basic Textarea Style
Now we got to know how to setup SummerNote text editor. Let's customize toolbar a bit
$(document).ready(function() {
    $('textarea#body').summernote({
        /** Default place holder for the WYSIWYG editor */
        placeholder: 'Enter your body',


        /** Height Settings */
        height: '300px',


        /** Toolbar settings */
        toolbar: [
            ['style', ['bold', 'italic', 'underline', 'clear']],
            ['font', ['strikethrough', 'superscript', 'subscript']],
            ['fontsize', ['fontsize']],
            ['color', ['color']],
            ['para', ['ul', 'ol', 'paragraph']],
            ['height', ['height']]
        ]
    });
});
The settings are self-explanatory so I have not added much on it. Now our text editor looks like the following
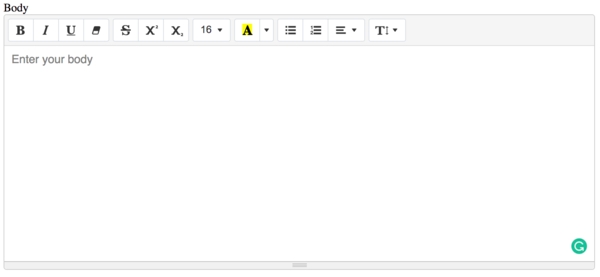
SummerNote WYSIWYG Editor Customized
Following is the complete code for the summernote text editor
<!DOCTYPE html>
<html lang="en">
<head>
    <meta charset="UTF-8">
    <meta name="viewport" content="width=device-width, initial-scale=1.0">
    <title>SummerNote Demo</title>
    <link href="https://cdn.jsdelivr.net/npm/summernote@0.8.18/dist/summernote-lite.min.css" rel="stylesheet">
</head>
<body>
    <form action="" method="post" enctype="multipart/form-data">
        <!-- Your HTML Body Goes Here -->
        <div>
            <label for="body">Body</label> <br>
            <textarea name="body" id="body" rows="10"></textarea>
        </div>
    </form>

    <script src="https://code.jquery.com/jquery-3.4.1.slim.min.js"></script>
    <script src="https://cdn.jsdelivr.net/npm/summernote@0.8.18/dist/summernote-lite.min.js"></script>

    <script>
        $(document).ready(function() {
            $('textarea#body').summernote({
                /** Default place holder for the WYSIWYG editor */
                placeholder: 'Enter your body',

                /** Height Settings */
                height: '300px',

                /** Toolbar settings */
                toolbar: [
                    ['style', ['bold', 'italic', 'underline', 'clear']],
                    ['font', ['strikethrough', 'superscript', 'subscript']],
                    ['fontsize', ['fontsize']],
                    ['color', ['color']],
                    ['para', ['ul', 'ol', 'paragraph']],
                    ['height', ['height']]
                ]
            });
        });
    </script>
</body>
</html>
Hope you enjoyed the article. Please share it with your friends.
NOTE: Code available in GitHub @ SummerNote WYSIWYG Editor
Laravel 7.x Multiple Database Connections, Migrations, Relationships & Querying
Securely Connect Server MYSQL DB From Sequel Pro / MYSQL Workbench
Setup AMP (Accelerated Mobile Pages) In PHP Laravel
Upload File From Frontend Server {GuzzleHttp} To REST API Server In PHP {Laravel}
Google reCAPTCHA Integration In PHP Laravel Forms
SQLite Doesn't Support Dropping Foreign Keys in Laravel
Securely SSH Your Server & Push Files With FileZilla
What Is Method Chaining In PHP?
Automate Repeating Tasks In Linux Server With Cronjobs
Multiple GIT Key Pairs Or Account In The Same Computer
Proper Way To Validate MIME Type Of Files While Handling File Uploads In PHP
Plain PHP Resumable Large File Uploads In Chunks Using FlowJs
Test Your Local Developing Laravel Web Application From Phone Browser Without Any Software
SummerNote WYSIWYG Text Editor Save Images To Public Path In PHP Laravel


