

Good content takes time and effort to come up with.
Please consider supporting us by just disabling your AD BLOCKER and reloading this page again.


Hello there! In this article you will learn how to implement Google ReCaptcha in PHP Laravel forms.
WHY Google ReCaptcha?
One of the basic question that will arise is why Google ReCaptcha? It's mainly because of security concerns. If you have contact form or any other form you don't want to get spammed with junk data. One way to fight against this is Google ReCaptcha.
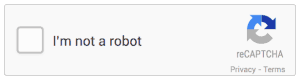
Google reCAPTCHA | PHP Laravel Example
You have fresh installation of Laravel with default Authentication setup. If you don't know how to setup the Basic Auth then I will come up with one more article soon where you will learn how to achieve it.
Please use the following URL to setup your Google ReCaptcha. You have to login with your registered account. You will be able to see the following new site form like the one shown in the following image.
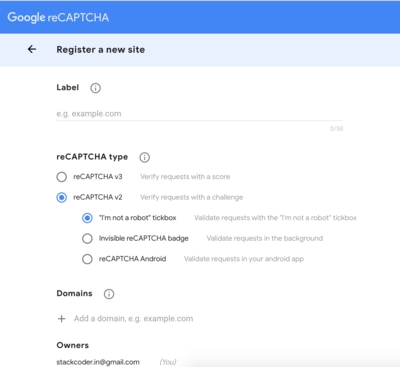
Google reCAPTCHA Form | After Sign In
As you see you have to fill the following from the above Image
Label - Name To Identify
Name of your website or something you can easily identify for which site you created it for.
reCAPTCHA type - Version Of reCAPTCHA
Your free to select V3 or V2 as per your needs. I am selecting
reCAPTCHA V2 -> "I'm not a robot" tick box
Domains - Domain Name (Website Name)
This is a must, if you don't specify the domain name then anyone with your keys can use it for free and you will be charged for it.
Accept Terms - Obviously if you don't you cant create reCaptcha auth keys.
Send Alert To Owners - Please check mark this
Then submit. You will RECAPTCHA SITE KEY & SECRET KEY.
.env FileNow you have ReCaptcha Keys generated add those to .env file as below. Observe RECAPTCHA_SITE_KEY & RECAPTCHA_SECRET_KEY.
RECAPTCHA_SITE_KEY=6LeIxAcTAAAAAJcZVRqyHh71UMIEGNQ_MXjiZKhI

RECAPTCHA_SECRET_KEY=6LeIxAcTAAAAAGG-vFI1TnRWxMZNFuojJ4WifJWe
NOTE: The above are Google Test Keys make sure not to use in your production
I am having contact form as you can see in the following URL of my website Contact Form. To get that kind of google recaptcha you have to add this in your blade template.
<!-- Add this javascript before the end of your /body tag !-->

<script src="https://www.google.com/recaptcha/api.js" async defer></script>


<div class="row form-group">

  <div class="col-md-12">
       <!-- As you can see the RECAPTCHA_SITE_KEY here we are using it from .env file -->
       <!-- We dont have any name here as by default google will include g-recaptcha-response name for this field -->
       <div class="g-recaptcha" data-sitekey="{{ env('RECAPTCHA_SITE_KEY') }}"></div>

       @error('g-recaptcha-response')

           <div class="text-danger"><em>{{ $message }}</em></div>

       @enderror

  </div>

</div>
Now you will be able to see the following image, which means you can configured everything fine till now. Hey buddy good going.
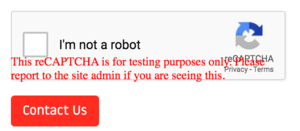
Google reCAPTCHA Image After Laravel Blade Integration
One we have show then google recaptcha it doesnt mean its all done and you can sit back and relax. The captcha has to be verified from google server to know it the user selected recaptcha was verified or not.
We can easily do this by using google library using composer. For more details see this URL on GIT repo Google Recaptcha
composer require google/recaptcha
This will download the necessary package via which we can validate the user sent recaptcha code.
Now when user fills the form and submit we need to do server side validation of the form details as shown in the following code
NOTE: I have used the custom validation rules in the following code ie GoogleRecaptcha() make sure to check the code in step 6/** This is my custom validation in laravel */
use App\Rules\GoogleRecaptcha;
public function store(){
request()->validate([
/** Other fields validated here */
'email' => 'required|email',
'description' => 'required',
/** See this line this is where google recaptcha will be validated */
'g-recaptcha-response' => new GoogleRecaptcha(),
]);
/** After successful validation store the data in your database */
/** You may want to send your self notification via email, sms */
}
If the google is not able to validate the user submitted recaptcha then it will throw error and will be sent back to user form with g-recaptcha-response. Where the following error block will handle to display the appropriate error message
As seen in Step 3
 @error('g-recaptcha-response')

    <div class="text-danger"><em>{{ $message }}</em></div>

@enderror
The following is full code for custom validation rule in Laravel
NOTE: If you want to learn how to create custom validation rules in Laravel then please follow my another article where I have given in depth details on it How To Create Custom Validation Rules In PHP Laravel (Using Artisan Command)
<?php

namespace App\Rules;

use Illuminate\Contracts\Validation\Rule;
use ReCaptcha\ReCaptcha;

class GoogleRecaptcha implements Rule
{
    /** REMOVED CONSTRUCTOR */

    public function passes($attribute, $value)
    {
        $recaptcha  = new ReCaptcha(env('RECAPTCHA_SECRET_KEY'));
        $response   = $recaptcha->verify($value, $_SERVER['REMOTE_ADDR']);
        return $response->isSuccess();
    }

    public function message()
    {
        return 'Please verify recaptcha.';
    }
}
Tada! You not finished the setup of your google recaptcha.
Now submit your form and check if everything works fine for you. If you leave recaptcha in form field empty then required error will be shown.
Remember
After implementing this you might feel that you are very safe, then my friend you have miss understood the cruel world. This is not be your final solution to your security issues. There might be libraries that may bypass this, but this acts as added bonus to overcome few of them.
You might be interested to read the following articles to get good understanding on the concepts what I have used here.
How To Create Custom Validation Rules In PHP Laravel (Using Artisan Command)
Create A Composer Package? Test It Locally And Add To Packagist Repository
Test Your Local Developing Laravel Web Application From Phone Browser Without Any Software
Basic Server Security Setup For Ubuntu / Linux
Install Letsencrypt SSL Certificate for RabbitMQ Server and RabbitMQ Management Tool
PHP Built-In Web Server & Testing Your Development Project In Mobile Without Any Software
URL Redirects From Called Functions In Laravel
Create / Save / Download PDF From Blade Template In PHP Laravel
Free Live Chat Integration Using TAWK.IO
Stripe Payment Integration With Laravel
Make Laravel Controllers Slim By Skimming Form Validation Request
Securely Connect Server MYSQL DB From Sequel Pro / MYSQL Workbench
Detect AdBlocker With Javascript And Increase Website Ads Revenue


