

Good content takes time and effort to come up with.
Please consider supporting us by just disabling your AD BLOCKER and reloading this page again.


Hello Amigos! In this article you will learn how to upload image in plain PHP.
This article covers
I have hosted this in GitHub. Feel free to you use is any of your project Image Upload Demo
Basic PHP, Database & HTML knowledge.
I have written another article proper way to validate the file in PHP Proper Way To Validate MIME Type Of Files While Handling File Uploads In PHP. Don't miss it.
First let me clear you few concepts, we can store the images in database as blob but we wont be doing that.
We will store the images in specific path of project. Why?
Following is the database design for our testing. As you see its very simple design. For the sake of example we have taken invoice as database name.
/** Creating database with name invoice */
CREATE DATABASE `invoice`;

/** Once we create we want to switch to invoice so that we can add products table */
USE `invoice`;

/** Products table to hold the products data */
CREATE TABLE `products` (
	`id` INT(11) UNSIGNED NOT NULL AUTO_INCREMENT,
	`name` VARCHAR(30),
	`product_image` VARCHAR(255),
	PRIMARY KEY (`id`)
);
Since we have only 2 fields in our database table products we will have only 2 fields in HTML form.
I wont be using bootstrap or anything for this it will be plain HTML code.
Following is my folder structure
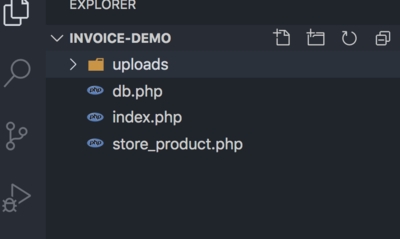
Invoice Project Folder Structure
uploads/products - This is the folder where we will be uploading the images to
db.php - File has the PHP database connection
index.php - File has our product form for the sake of simplicity
store_product.php - File where we handle storing our product to database and images to uploads/products folder
Make sure your form has enctype="multipart/form-data" attribute in index.php file. Else the files wont be passed in your HTML form.
index.php
<!DOCTYPE html>
<html lang="en">
<head>
    <meta charset="UTF-8">
    <meta name="viewport" content="width=device-width, initial-scale=1.0">
    <title>Invoice Demo</title>
    <style>
        form{ width: 250px; margin: auto; }
        form input{ width: 100%; padding: 3px; }
    </style>
</head>
<body>
    <form action="store_product.php" method="post" enctype="multipart/form-data">
        <div>
            <label for="product_name">Product Name</label> <br>
            <input type="text" name="product_name" id="product_name">
        </div><br>
        <div>
            <label for="product_image"></label> <br>
            <input type="file" name="product_image" id="product_image">
        </div><br>
        <div>
            <input type="submit" value="Create Product">
        </div>
    </form>
</body>
</html>
The above form will look like the following from your browser
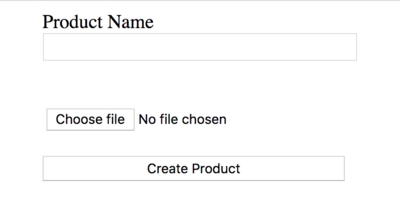
New Product Page | index.php
You need to connect PHP with database so that PHP will get to know what to add in which database & tables.
Following is how your db.php file will look like. I am using PDO connection but you can go ahead and use mysqli function
db.php
<?php
$host           = 'localhost';
$db_name        = 'invoice';
$db_username    = 'root';
$db_password    = 'root';
$dsn            = 'mysql:host='. $host .';dbname='. $db_name;
$options        = [
                    PDO::ATTR_ERRMODE            => PDO::ERRMODE_EXCEPTION,
                    PDO::ATTR_DEFAULT_FETCH_MODE => PDO::FETCH_ASSOC,
                    PDO::ATTR_EMULATE_PREPARES   => false,
                ];
try {
    $pdo = new PDO($dsn, $db_username, $db_password);
} catch (PDOException $e) {
    exit($e->getMessage());
}
Once you fill the form you need to save it. Our form redirects to store_product.php file. Now you need to add the following PHP code code handle the other field data as well as image.
I will explain most of the stuff in comments, so kindly bear with me :)
When you do print_r($_FILES['product_image']); you will be able to see the image details as shown in the following code which will help you to debug and even play around images
Array
(
    [name] => Webp.net-resizeimage__43_.jpg
    [type] => image/jpeg
    [tmp_name] => /Applications/MAMP/tmp/php/php4TyPHk
    [error] => 0
    [size] => 12593
)
The following is the code snippet to add the product details in database
store_product.php
<?php
session_start();
require_once 'db.php';

if ($_SERVER['REQUEST_METHOD'] == 'POST') {
    $product_name   = $_POST['product_name'];

    /** I am using pathinfo to fetch the details of the PHP Image */
    $file_name = $product_image['name'];
    $file_size = $product_image['size'];
    $file_tmp = $product_image['tmp_name'];
    $pathinfo = pathinfo($file_name);
    /** Since I want to rename the image I need its extension
     * which will be obtained with above $phpinfo variable
     * */
    $extension = $pathinfo['extension'];
    /** generate random inage name */
    $new_image_name = rand(0, 10000000).time().md5(time()).'.'.$extension;
    move_uploaded_file($file_tmp, './uploads/products/'. $new_image_name);

    $product = $pdo->prepare("
        INSERT INTO
            `products` (`name`, `product_image`)
        VALUES
            (:product_name, :product_image)
    ")
    ->execute([
        ':product_name'     => $product_name,
        ':product_image'    => $new_image_name,
    ]);

    if ($product) {
        echo 'Product added successfully';
    }
}
What if the image is not added and product name is not added? A dummy data will be stored in our database. This is not what we want. So lets do some validation of the same
We can simply add the following code to validate the form fields and then return the errors to index.php file
store_product.php
<?php
session_start();
require_once 'db.php';

if ($_SERVER['REQUEST_METHOD'] == 'POST') {
    /** array variable to hold errors */
    $errors = [];

    $product_name   = $_POST['product_name'];
    $product_image  = $_FILES['product_image'];
    /** Add form validation */
    if (empty($product_image['name'])) {
        $errors[] = 'Product image required';
    }
    if (empty($product_name)) {
        $errors[] = 'Product name required';
    }
    if (count($errors) > 0) {
        /** Add all the errors to session and then display in frontend */
        $_SESSION['errors'] = $errors;
        header('Location: index.php');
    }


    /* Earlier image uploading & database saving code */

}
<?php
/** Dont forget to start your session */
session_start();
?>
<!DOCTYPE html>
<html lang="en">
<head>

</head>
<body>
    <?php
        /** Get all the errors from session */
        $errors = $_SESSION['errors'];
        /** After storing the errors in $errors unset from session
         *  We need to do this so that when I refresh the page in index.php it should be blank
         */
        unset($_SESSION['errors']);
        if(isset($errors)){
            foreach($errors as $error){
                echo '<p>'. $error .'</p>';
            }
        }
    ?>
    <form action="store_product.php" method="post" enctype="multipart/form-data">
        <!-- Form fields -->
    </form>
</body>
</html>
Okay now we have simple validations of the form fields now we need to strictly check the image validation also
Image validations
jpeg, jpg, png, svg, webp images/** I am using pathinfo to fetch the details of the PHP Image */
$file_name = $product_image['name'];
$file_size = $product_image['size'];
$file_tmp = $product_image['tmp_name'];
$pathinfo = pathinfo($file_name);
$extension = $pathinfo['extension'];
$image_extensions = ['jpeg', 'jpg', 'png', 'svg', 'webp'];
/** File strict validations */
/** File exists */
if(!file_exists($file_tmp)){
$errors[] = 'File your trying to upload not exists';
}
/** Check if the was uploaded only */
if(!is_uploaded_file($file_tmp)){
$errors[] = 'File not uploaded properly';
}
/** Check for the image size 1024 * 1024 is 1 MB & 1024 KB */
if($file_size > (1024 * 1024)){
$errors[] = 'Uploaded image is greater than 1MB';
}
/** Check image extensions */
if(!in_array($extension, $image_extensions)){
$errors[] = 'Image allowed extensions '. implode(', ', $image_extensions);
}
if (count($errors) > 0) {
$_SESSION['errors'] = $errors;
header('Location: index.php');
exit;
}
Hope you got to know few basic things.
I have uploaded the whole project in GitHub repository, find it here Invoice Project DemoEnsure text remains visible during Webfont load
SummerNote WYSIWYG Text Editor Save Images To Public Path In PHP Laravel
Search Engine Optimization Concepts
Create Custom 404 Page In Laravel
Redirect www to a non-www Website Or Vice Versa
Relationship Table Data With Route Model Binding In Laravel
Firebase Cloud Messaging (FCM) Browser Web Push Notifications Using Javascript And PHP
Website Speed and Performance Optimizations
Lazy Load Images In Chrome With This Simple Trick
Integrate Google Translate Into Your Website
Client-Side Form Validation With Javascript


