

Good content takes time and effort to come up with.
Please consider supporting us by just disabling your AD BLOCKER and reloading this page again.


Gone are the days where we used to use username/ip_address and password to access your remote server with FileZilla and push the files to remote server.
In current trends SSH is the key to add an extra layer of security to your servers.
If you don't have FileZilla software then you can download it from this URL Download FileZilla
If your not sure how to setup SSH keys then you can follow these articles:
How To Generate SSH Key with ssh-keygen In Linux / Unix
Managing Multiple GIT Key Pairs Or Account In The Same Computer
Once you have downloaded the software from the above URL, open it by double clicking.
New Site -> (Left Panel) Add Your Site Name -> (Right Panel) General
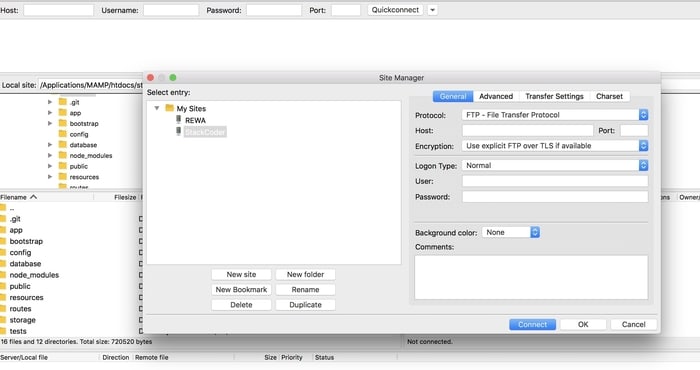
FileZilla New Connection, New Site
Protocol - SFTP SSH File Transfer Protocol
By default FTP will be selected, select SFTP from dropdown as you want to securely connect to your server.
Host - stackcoder.in
Add your website domain name or ip_address, for example I am using stackcoder.in
Port - 22
This is your server default SSH port. Unless you have configured something else in your server keep it the same.
Login Type - Key File
Since we want to connect it via SSH key files generated ie id_rsa, id_rsa.pub so that it will be more secure.
User - stackcoder
By default it will be root most of the time, since I have made initial server setup I have created user with name stackcoder.
Key File - id_rsa
Usually you will connect with id_rsa file which will be in ~/.ssh/ folder.
Background Colour (Optional) - Select Colour
This is optional, just if you want to segregate the testing and production environment
Comments (Optional) - Comment
Write some comments for your follow up or notes purpose.
Once you fill the above details your FileZilla will look like the following
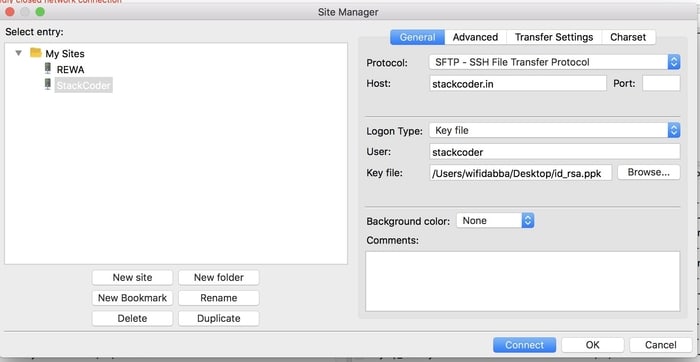
FileZilla Credentials Filled
NOTE: This may prompt to create private key with .ppk file extension. Just select the location and add name of the file.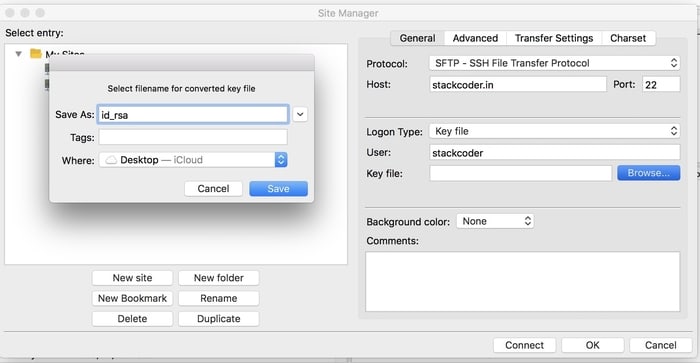
FileZilla On Create Asks To Create .PPK File
After filling the above once you click connect. Check mark I always trust to make sure for the next and subsequent connection it wont prompt you ssh pass phrase like in the following
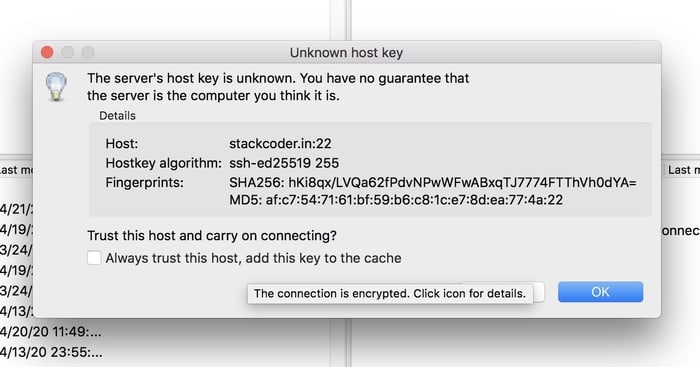
FileZilla Trust Host Prompt | Please Tick Mark Checkbox
On successful connection you will be able to see you local laptop or computer files on the left side and your remote server files on your right side as in the following file
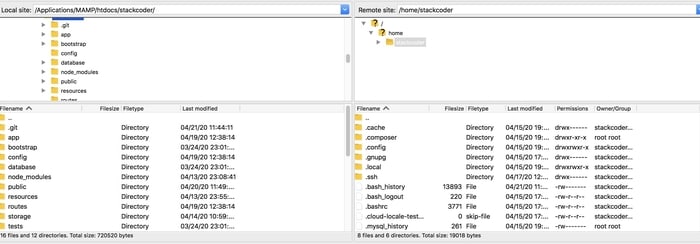
FileZilla Successful SSH Server Connection
Just pull the files from the left project folder and push it to the required folder on the right side. Make sure to select Local Site & Remote Site path
WHATS NEXT?
I think the article was really helpful for you. I highly suggest you to move on and use some kind of version control system like GIT, SVN, MERCURIAL. As per my preference I highly suggest you take a look at GIT.
Free SSL Certificate With Lets Encrypt/Certbot In Linux (Single / Multiple Domains)
composer.json v/s composer.lock
Simple Way To Create Resourceful API Controller In Laravel
Generate RSS Feeds in PHP Laravel
Sass or SCSS @mixin vs @extends vs Placeholder (%)
Create Zip File On The Fly With Streaming Download In PHP Laravel
PHP Built-In Web Server & Testing Your Development Project In Mobile Without Any Software
Plain PHP Resumable Large File Uploads In Chunks Using FlowJs
Cache Static Files With NGINX Server
Laravel Clear Cache Of Route, View, Config Command
Securely SSH Your Server & Push Files With FileZilla


