

Good content takes time and effort to come up with.
Please consider supporting us by just disabling your AD BLOCKER and reloading this page again.


Hola Amigos! In this article you will learn a very interesting topic ie. to create free SSL Certificate with LetsEncrypt using Certbot. Yes you heard and saw it right, all free of cost.
Your website must be linked to domain name ie it must be running with website name and not on ip address , this is must and should else Certbot configuration wont work for just ip address
I hope you guys have setup up server for this, If still not yet & want to install LAMP / LEMP then kindly go through my article. But this article doesn't restrict you with LAMP or LEMP. You can do with any other server setup too.
How To Install Linux, Apache, MYSQL, PHP (LAMP Stack) on Ubuntu
How To Install Linux, NGINX, MYSQL, PHP (LEMP Stack) on Ubuntu
How To Do Basic Server Security Setup For Ubuntu / Linux
NOTE: Since there will be lot of configurations for different OS & Web Servers. I will give demo with UBUNTU 18.04 Server & APACHE/NGINX Web Server. This is a standard process and shall remain almost same.
You can visit Certbot site and select your OS & Web server configurations as per your requirement.
Ubuntu 18.04) & Web Server (Apache/Nginx)Visit Certbot and select you configuration I have selected Apache/Nginx & Ubuntu 18.04. As shown in the following image
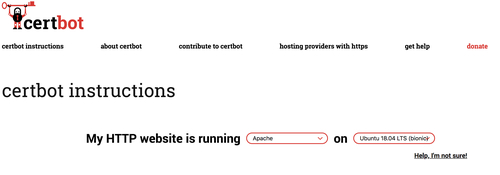
Web Server & OS Selection | Certbot
Now SSH to your website hosted server and you must be having SUDO privileges this will be usually in Digital Ocean, Linode, Amazon AWS, Google Cloud or any other. Like the following command
ssh user_name@server_ip_address
Now add Certbot PPA to your list of repositories
sudo apt-get update
sudo apt-get install software-properties-common
sudo add-apt-repository universe
sudo add-apt-repository ppa:certbot/certbot
sudo apt-get update
sudo apt-get update
sudo apt-get install software-properties-common
sudo add-apt-repository universe
sudo add-apt-repository ppa:certbot/certbot
sudo apt-get update
Run the following command to install Certbot
sudo apt-get install certbot python-certbot-apache
sudo apt-get install certbot python-certbot-nginx
To run the Certbot there are 2 ways:
This will automatically install Certbot and install HTTPS automatically
APACHE Installation
sudo certbot --apache
NGINX Installation
sudo certbot --nginx
NOTE: If your running the above command for the 1st time then it will ask you to
i. Agree terms & condition - (A)
ii. Share Email - Yes / No as per your preferences
When you run the above command the Certbot will automatically ready your APACHE/NGINX configuration files and try to suggest all the domains names for which you want to add the SSL certificates. Like the following image:
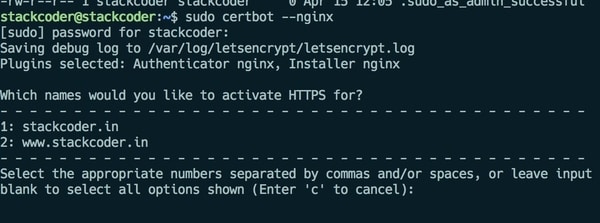
Certbot SSL Installation | Domains List
Then once the above step is done it will ask you to choose to redirect all the requests to HTTP traffic to HTTPS, Since I need my site to be secure I always select it to be 2 option ie Redirect as in the following image:
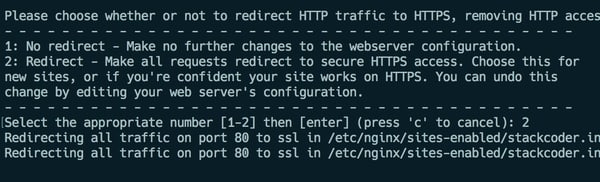
Confirm Redirect Traffic From HTTP to HTTPS
Once installation is completed Certbot will tell you the location of the files kept and few donations link like the following image:
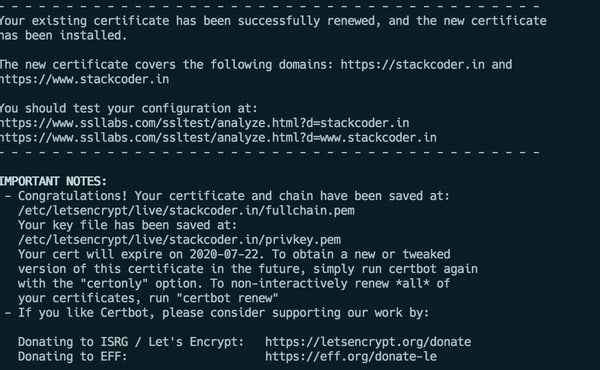
SSL Installation Completed
If you feel something fishy with Certbot and only install certificates then you can run the command manually
APACHE Installation
sudo certbot certonly --apache
NGINX Installation
sudo certbot certonly --nginx
The certificate installed will be valid for only 3 months because of security reasons. But the best part is you can renew certificates periodically with the following command
sudo certbot renew --dry-run
NOTE: Certificates wont update until it nearly the renewal period, you will get similar output if you try manually
Cert not due for renewal, but simulating renewal for dry run
Instead of running the renew command monthly or when expired its better to setup cronjob to do so.
First Open Crontab where you will schedule all your cron jobs. This may ask you to select the editor if your opening for the first time.
sudo crontab -e
Then paste the following command inside crontab, this tells that the Cerbot renewal should run every week on Sunday mid night.
0 0 * * 0 sudo certbot renew --dry-run
Whats does the above configuration mean is for every month on 1st at 12 AM irrespective of day of the week run the command COMMAND_TO_RUN
minute | hour | day_of_month | month | day_in_week COMMAND_TO_RUN
To learn more on cronjob I have written an entire article on it How To Automate Repeating Tasks In Linux Server With Cronjobs
I believe you got it working too. Make sure to select your OS & Web Server from Certbot domain according to your needs.
PHP file_put_contents failed to open stream: Permission denied
Install Apache Web Server On Ubuntu 20.04 / Linux & Manage It
Install Linux, NGINX, MYSQL, PHP (LEMP Stack) on Ubuntu
What Is Method Chaining In PHP?
Laravel 7.x Multiple Database Connections, Migrations, Relationships & Querying
PHP extension ext-intl * is missing
Install Letsencrypt SSL Certificate for RabbitMQ Server and RabbitMQ Management Tool
Lazy Load Images In Chrome With This Simple Trick
Upload File From Frontend Server {GuzzleHttp} To REST API Server In PHP {Laravel}
Free SSL Certificate For CPanel
Sass or SCSS @mixin vs @extends vs Placeholder (%)
Laravel Last Executed Query In Plain SQL Statement For Debugging


