

Good content takes time and effort to come up with.
Please consider supporting us by just disabling your AD BLOCKER and reloading this page again.


Trying to connect more than 1 database in Laravel, then you have come to the right place.
In this article you will learn how to connect to 2 MYSQL databases in Laravel.
First and then foremost question is why the heck do I need more than 1 database for my project. One of the answer is making your project modular or think that you want certain things to keep independent of that of current database.
Use this link to get the full project on GitHub Laravel Multiple Database Connection
You need to have a fresh installation of Laravel or existing Laravel project.
If you don't have a Laravel then, first go to the folder (htdocs or html most of the times) where you want to install the fresh copy of Laravel & use the following command to setup one.
multidb is the name of the project that I will be creating. Change as per you needs.
composer create-project --prefer-dist laravel/laravel multidb
NOTE: I have createdblog1&blog2database inMYSQLfor the sake of example. You may have some other database name. I am creating both inMYSQL, you might have requirement that blog1 database may be inMYSQL&blog2might be inPostgresDatabase
You can use GUI tools like PHPMyAdmin, MYSQL Workbench, Sequel Pro for creating databases faster.
If you want to create database from command prompt then first login to MYSQL terminal using the following command
sudo mysql -uroot -p
It asks for password enter your database password.
Now create databases blog1 & blog2, please change database name as per your requirements
In MYSQL command prompt use the following commands to create. I am using UTF8 character set.
CREATE DATABASE blog1 CHARACTER SET utf8 COLLATE utf8_general_ci;
CREATE DATABASE blog2 CHARACTER SET utf8 COLLATE utf8_general_ci;
.env SettingsDefault you have the following connection, which connects to blog1 database, I am using MYSQL for both databases, make sure to choose the database driver which you need.
.env Settingsblog1 Database in .envDB_CONNECTION=mysql
DB_HOST=127.0.0.1
DB_PORT=3306
DB_DATABASE=blog1
DB_USERNAME=root
DB_PASSWORD=root
blog2 Database in .envDB_CONNECTION_SECOND=mysql
DB_HOST_SECOND=127.0.0.1
DB_PORT_SECOND=3306
DB_DATABASE_SECOND=blog2
DB_USERNAME_SECOND=root
DB_PASSWORD_SECOND=root
Overall your connection will look like the following in .env
DB_CONNECTION=mysql
DB_HOST=127.0.0.1
DB_PORT=3306
DB_DATABASE=blog1
DB_USERNAME=root
DB_PASSWORD=root
DB_CONNECTION_SECOND=mysql
DB_HOST_SECOND=127.0.0.1
DB_PORT_SECOND=3306
DB_DATABASE_SECOND=blog2
DB_USERNAME_SECOND=root
DB_PASSWORD_SECOND=root
app/config/database.php SettingsObserve the following line carefully, it tells which connection to make default
'default' => env('DB_CONNECTION', 'mysql'),
Note: Copymysqltomysql2like the following in app/config/database.php file. And inmysql2array check_SECONDsettings which will be loaded from.envfile
In app/config/database.php
return [
    /** Change mysql or mysql2 to make which one you wan to make it default */
    'default' => env('DB_CONNECTION', 'mysql'),

    'connections' => [
        /** Other database code */
        'mysql' => [
            'driver' => 'mysql',
            'url' => env('DATABASE_URL'),
            'host' => env('DB_HOST', '127.0.0.1'),
            'port' => env('DB_PORT', '3306'),
            'database' => env('DB_DATABASE', 'forge'),
            'username' => env('DB_USERNAME', 'forge'),
            'password' => env('DB_PASSWORD', ''),
            'unix_socket' => env('DB_SOCKET', ''),
            'charset' => 'utf8mb4',
            'collation' => 'utf8mb4_unicode_ci',
            'prefix' => '',
            'prefix_indexes' => true,
            'strict' => true,
            'engine' => null,
            'options' => extension_loaded('pdo_mysql') ? array_filter([
                PDO::MYSQL_ATTR_SSL_CA => env('MYSQL_ATTR_SSL_CA'),
            ]) : [],
        ],

        'mysql2' => [
            'driver' => 'mysql',
            'url' => env('DATABASE_URL_SECOND'),
            'host' => env('DB_HOST_SECOND', '127.0.0.1'),
            'port' => env('DB_PORT_SECOND', '3306'),
            'database' => env('DB_DATABASE_SECOND', 'forge'),
            'username' => env('DB_USERNAME_SECOND', 'forge'),
            'password' => env('DB_PASSWORD_SECOND', ''),
            'unix_socket' => env('DB_SOCKET_SECOND', ''),
            'charset' => 'utf8mb4',
            'collation' => 'utf8mb4_unicode_ci',
            'prefix' => '',
            'prefix_indexes' => true,
            'strict' => true,
            'engine' => null,
            'options' => extension_loaded('pdo_mysql') ? array_filter([
                PDO::MYSQL_ATTR_SSL_CA => env('MYSQL_ATTR_SSL_CA'),
            ]) : [],
        ],
        /** Other database code */
    ]
];
Note: I have kepmysqlas my default connection which meansblog1is default database
Now you have setup your database connections lets run migrations for 2 different databases
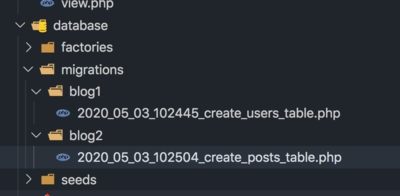
I want to segregate the databases in separate folders so that I can migrate them very easily and even can check which tables belongs to which database I usually prefer the following folders structure:
database/migrations/blog1/
database/migrations/blog2/
Example:
I want to createusersinblog1database with migrations inside database/migrations/blog1/ folder.
I want to createpostsinblog2database with migrations inside database/migrations/blog2/ folder.
Migrations In Blog1 & Blog2 Database
Use the following command to make Model & Migrations
NOTE: Makeblog1&blog2folders insidedatabase/migrationsfirst else you will get error as No such file or directory
php artisan make:model Models/User
php artisan make:model Models/Post
php artisan make:migration create_users_table --path="database/migrations/blog1" --table=users
php artisan make:migration create_posts_table --path="database/migrations/blog2" --table=posts
With the above now your migrations code must look somewhat similar to the following
users migrations classTip: Here no need to specify which database connection it should go for as by default its blog1
public function up()
{
  Schema::create('users', function (Blueprint $table) {
    $table->bigIncrements('id');
    $table->string('email');
    $table->string('password');
    $table->string('name');
    $table->timestamps();
  });
}

public function down()
{
  Schema::dropIfExists('users');
}
posts migrations classTip: Observer Schema::connection('mysql2') it tells that the table posts must go for blog2 database.
use Illuminate\Database\Query\Expression;
/** Other code */
public function up()
{
    Schema::connection('mysql2')->create('posts', function (Blueprint $table) {
        $table->bigIncrements('id');
        $table->unsignedBigInteger('user_id');
        $table->foreign('user_id')->references('id')->on(new Expression('blog1.users'));
        $table->string('title');
        $table->longText('body');
        $table->dateTime('published_on')->nullable();
        $table->timestamps();
    });
}

public function down()
{
    Schema::connection('mysql2')->dropIfExists('posts');
}
Observer the following for foreign key across blog1 databases
$table->unsignedBigInteger('user_id');
$table->foreign('user_id')->references('id')->on(new Expression('blog1.users'));
This is a tricker part. Now as we know we have stored the migrations in blog1 & blog2 folder respectively. Now we need to run them seperately.
Tip:--database&--pathis very important else your migrations wont work
php artisan migrate --database="mysql" --path="database/migrations/blog1"
php artisan migrate --database="mysql2" --path="database/migrations/blog2"
Tip:--database&--pathis very important else Laravel will throw error
php artisan migrate:rollback --database="mysql2" --path="database/migrations/blog2"
php artisan migrate:rollback --database="mysql" --path="database/migrations/blog1"
Note: Also note that when you do rollback ie when you try to delete users table first before posts table then you will get parent table cant be deleted. So use the following code before doing so.
In down() method of users & posts migrations add the following code if you don't want the foreign key errors to be thrown
class CreateUsersTable extends Migration
{
    public function down()
    {
        \DB::select("SET FOREIGN_KEY_CHECKS = 0");
        Schema::dropIfExists('users');
        \DB::select("SET FOREIGN_KEY_CHECKS = 1");
    }
}
 class CreatePostsTable extends Migration
    public function down()
    {
        \DB::select("SET FOREIGN_KEY_CHECKS = 0");
        Schema::connection('mysql2')->dropIfExists('posts');
        \DB::select("SET FOREIGN_KEY_CHECKS = 1");
    }
}
Now we need to create relationships between the models
User ModelTip: Make sure to include protected $connection = 'mysql';
class User extends Model
{
    /** Make sure to include this line in every model */
    protected $connection = 'mysql';

    public function posts()
    {
        return $this->hasMany('App\Models\Post');
    }
}
Post ModelTip: Make sure to include protected $connection = 'mysql2';
class Post extends Model
{
    protected $connection = 'mysql2';

    public function user()
    {
        return $this->belongsTo('App\Models\User');
    }
}
Now run the queries to get the different database related data.
I am using tinker for demo
php artisan tinker
App\Models\User::with(['posts'])->get();
>>> App\Models\User::with(['posts'])->get();
=> Illuminate\Database\Eloquent\Collection {#3030
   all: [
    App\Models\User {#3042
     id: 1,
     email: "channaveer@gmail.com",
     password: "$2y$10$sMQo8KdUIqlazZaY3U.8LO6cuWo0OthweJe/hfQ2IKX1eKTQMUP0G",
     name: "channaveer",
     created_at: null,
     updated_at: null,
     posts: Illuminate\Database\Eloquent\Collection {#3026
      all: [
       App\Models\Post {#3046
        id: 3,
        user_id: 1,
        title: "FirstPost",
        body: "First Body",
        published_on: null,
        created_at: null,
        updated_at: null,
       },
       App\Models\Post {#3048
        id: 4,
        user_id: 1,
        title: "Second Post",
        body: "Second Body",
        published_on: null,
        created_at: null,
        updated_at: null,
       },
      ],
     },
    },
   ],
  }
Use this link to get the full project on GitHub Laravel Multiple Database Connection
I really enjoyed writing this article. Hope it was helpful for you. If you like it then please do share with your friends. You can you Twitter & WhatsApp icon to share.
Custom Validation Rules In PHP Laravel (Using Artisan Command)
Client-Side Form Validation With Javascript
Debugging Laravel Queue Email Issues
Factory States For Clean And Fluent Laravel Testing
Push Files To CPanel / Remote Server using FTP Software FileZilla
Google, Twitter, GitHub, Facebook & Many Other Social Generic Logins With PHP Laravel Socialite
Install RabbitMQ with Docker & Running with NodeJS
Foreign Key Migrations Simplified In Laravel 7.x
Localization In Laravel REST API
Create / Save / Download PDF From Blade Template In PHP Laravel
Composer Install v/s Composer Update
Sass or SCSS @mixin vs @extends vs Placeholder (%)
Search Engine Optimization Concepts
Generate SSH Key with ssh-keygen In Linux / Unix
Unable to prepare route [{fallbackPlaceholder}] for serialization. Uses Closure In Laravel


