

Good content takes time and effort to come up with.
Please consider supporting us by just disabling your AD BLOCKER and reloading this page again.


Hey there! I am back again with simple FileZilla FTP software. If you are a newbie and have access to your CPanel or Server and want to push files to remote server or cpanel public folder and finding it really difficult to do so, then this is a custom made article for you.
If you don't have FileZilla software then you can download it from this URL Download FileZilla
Similar Tool
Cyber Duck - Download Cyberduck
NOTE: For security reasons you have to upgrade yourself and start using the most secured way to push your files. Wondering how? Don't worry I have written an article for you How To Securely SSH Your Server & Push Files With FileZilla.
Once you have downloaded the software from the above URL, open it by double clicking.
New Site -> (Left Panel) Add Your Site Name -> (Right Panel) General
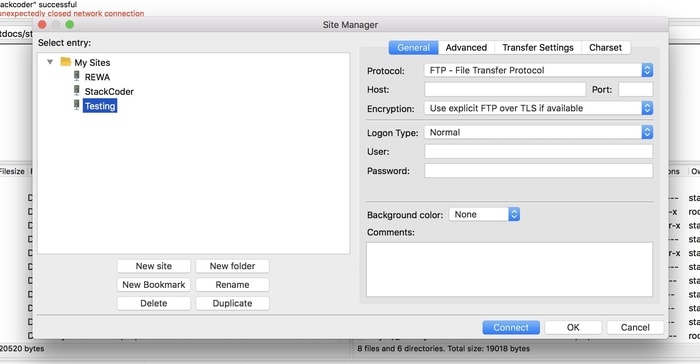
FileZilla FTP New Site Page
Protocol - FTP File Transfer Protocol
From dropdown please select FTP option as we are gonna connect to basic FTP Protocol connection.
Host - Website name / IP Address
Add website name or ip address of your website where you want to connect to push the files
Port (Optional)- [21]
By default the port will be 21 for FTP connection. Don't make any changes unless you changed port configurations in your server.
Encryption - Use Explicit FTP Over TLS if Available
Select this Use Explicit FTP Over TLS if Available option from dropdown.
Logon Type - Normal
Select Normal from dropdown as we want to authenticate just with username & password for normal login types
User - Credentials
This is your server username which you would have got when you purchase Hosting space from GoDaddy/Hostgator etc.
Password - Credentials
This is your server password which you would have got when you purchase Hosting space GoDaddy/Hostgator etc.
Background Colour (Optional) - Select Colour
This is optional, just if you want to segregate the testing and production environment
Comments (Optional) - Comment
Write some comments for your follow up or notes purpose.
Once you fill the above details it will look like the following image
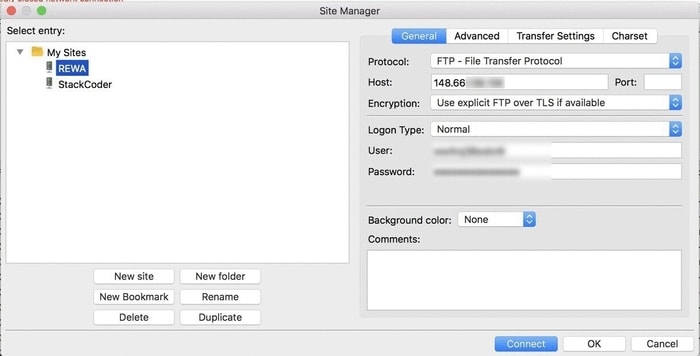
FileZilla FTP Connection | Credentials Filled
Once you follow the step 1 correctly and click on Connect button then you will be successfully connected.
It may ask you any prompt to save for future connect the checkmark the box and click ok.
Now you will be able to see the following screen after connection
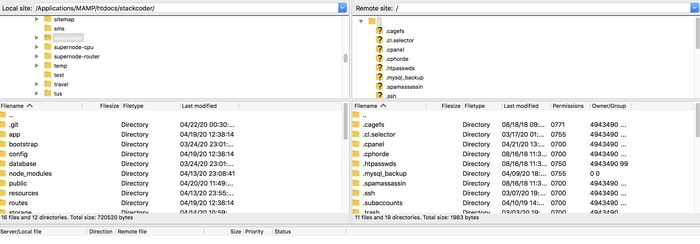
FileZilla FTP Successful Connected
Now you can push you local files to your server files by just dragging from left side to right side. Make sure to open the proper files and folder before doing so.
In this article you learned how to do simple FTP connection. But I highly recommend to switch to secure SSH connection with FileZilla. I have written an article on it have a look
How To Securely SSH Your Server & Push Files With FileZilla
Free Live Chat Integration Using TAWK.IO
Client-Side DataTable, Adding Super Powers To HTML Table
URL Redirects From Called Functions In Laravel
Basic Server Security Setup For Ubuntu / Linux
Setup MAMP Virtual Hosts For Local PHP Development
Google reCAPTCHA Integration In PHP Laravel Forms
What Is HTTP? Different HTTP Methods And Status Codes Explained With Examples
Make Laravel Controllers Slim By Skimming Form Validation Request
Send Email In PHP With PHPMailer
Factory States For Clean And Fluent Laravel Testing
Create Zip File On The Fly With Streaming Download In PHP Laravel
Foreign Key Migrations Simplified In Laravel 7.x
What Is Composer? How Does It Work? Useful Composer Commands And Usage


