

Good content takes time and effort to come up with.
Please consider supporting us by just disabling your AD BLOCKER and reloading this page again.


Hi there! I am back with the new article on the Free SSL certificate for CPanel. In my old article, I had written Free SSL Certificate With ZeroSSL, but the problem with ZeroSSL is it turned to a paid model .
So this is counter for that :) Hope you like it.
In this article, we will cover
First, we will go to the above link. Its an open source and the source code is available in GitHub at GetHttpsForFree so you can trust the source without a second thought.
The above web integration uses LetsEncrypt which is an open source leader for free SSL in the market currently and very secure.
Let's Encrypt requires that you register an account email and public key before issuing a certificate.
Once you open the above website you will see the following Step 1 image
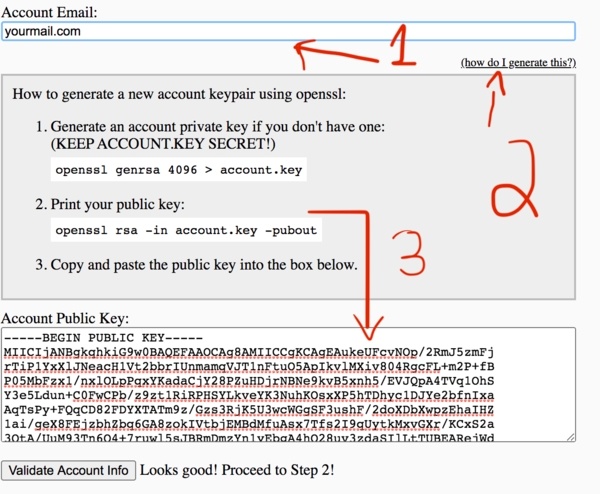
Account Info | Free SSL Certificate
1) Enter email id -> Email is required by LetsEncrypt so that it will notify the expiry of your certificate. Make sure to enter the correct one
2) Now you need to add Account Public Key. To know more details on how to generate the keys click on the 2nd step in the above image (how do I generate this?).
3) Account Key Generation - Make sure to go to ~/.ssh or any other folder where you can keep your website keys safe and run the following commands
Note: Run the following commands in your terminal/command prompt
openssl genrsa 4096 > account.key
The above commands creates account.key file
openssl rsa -in account.key -pubout
The above command prints the Account Public Key which you need to paste in the textarea as shown in 3rd step of the above image.
Once you paste the Account Public Key now click on Validate Account Info button. Once it validates and gives success proceed to next step
This is the certificate signing request (CSR) that you send to Let's Encrypt in order to issue you a signed certificate. It contains the website domains you want to issue certs for and the public key of your TLS private key.
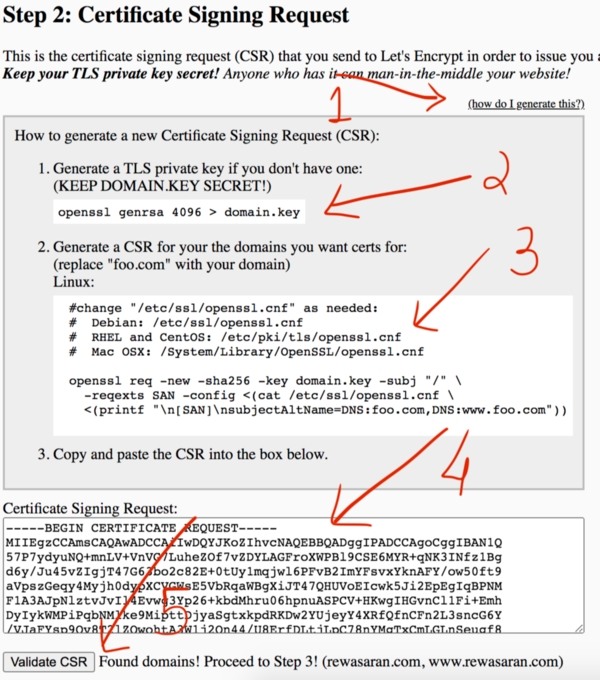
Certificate Signing Request (CSR) | Free SSL Certificate
1) How To Generate - To know more details to generate the CSR click on 1st Link of the above image
2) Create TLS Private Key - To create this key run the following command
openssl genrsa 4096 > domain.key
The above command generates the domain.key file
3) Add Domain Name - Add the domain name to generate CSR for. Run the following command in your terminal
NOTE: REPLACEfoo.com&www.foo.comwith your respective domains names
openssl req -new -sha256 -key domain.key -subj "/" \
      -reqexts SAN -config <(cat /etc/ssl/openssl.cnf \
      <(printf "\n[SAN]\nsubjectAltName=DNS:foo.com,DNS:www.foo.com"))
4) CSR key - After running the above command ie 3) it will output the code. Copy and paste as shown in the above image 4th link
5) Click on Validate CSR button to verify and find your domain name.
Let's Encrypt requires that you sign all of your requests to them with your account private key. Below are the requests that you will need to sign. The commands to do this are generated below so you can copy-and-paste them into your terminal.
NOTE: Make sure to be in the same folder location where you are running the above commands
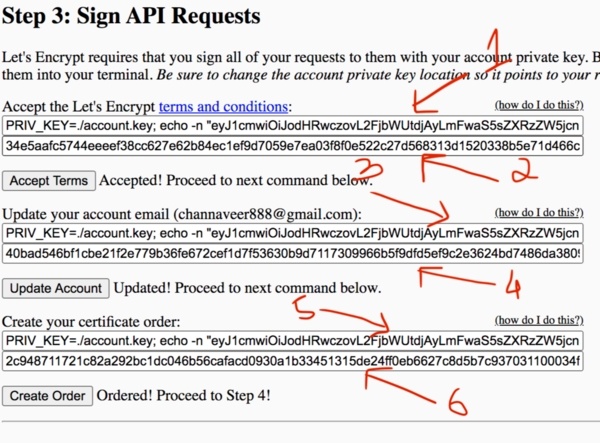
Lets Encrypt Sign API Requests | Free SSL Certificate
1) Accept Lets Encrypt Terms - To accept Let's Encrypt terms please copy and paste 1 arrow link code and paste in your terminal/command prompt which will generate and return you result in code which you need to copy and paste from terminal to 2)
2) Once you follow 1) you will get return code which you need to paste as shown in arrow 2.
Click Accept Terms
Similar to 1) and 2) as shown above follow for 3) 4) & 5) 6)
NOTE: This step is bit lengthy but very easy. So don't get bored.
Let's Encrypt requires you to prove you own the domains you have in your CSR.
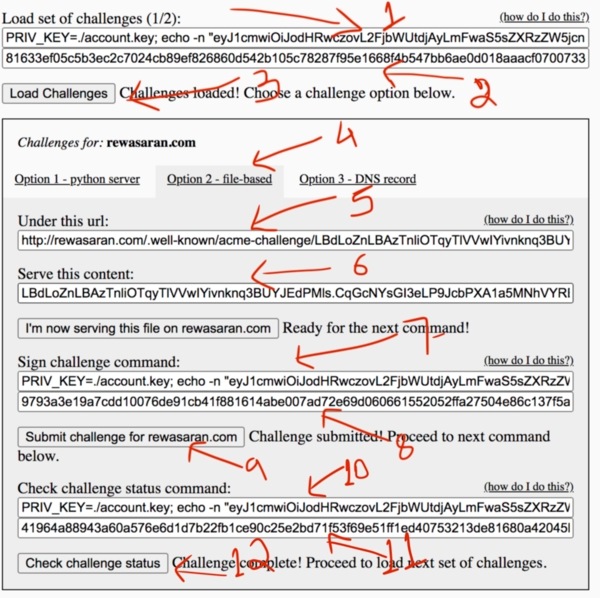
Verify Domain Authority | Free SSL Certificate
1) Copy the code and run in your terminal/command prompt. It will return code which you need to add in 2)
2) Copy the returned code from 1) and paste in arrow 2) as shown in the above image
3) Click on Load Challenges for verification.
4) For challenges, I am choosing File Based feel free to use Python Server / DNS Record
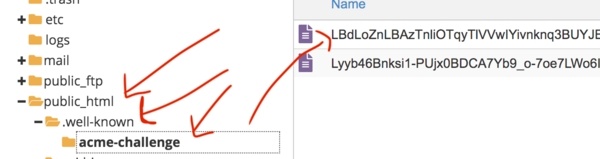
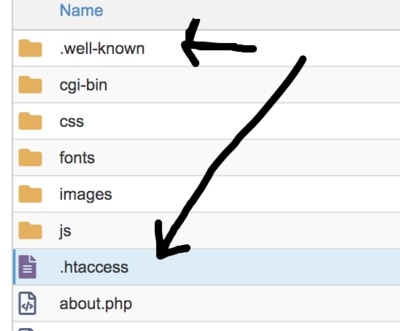
5) Under your domain name make sure to create .well-known folder and inside this folder create acme-challenge folder. Inside that folder file with name -> copy the last bit of the code which starts as LBdLo.... till the end. Make sure that the last part is the name of the file. Inside this file you will add 6) as shown in the following image
6) Now copy and paste the 6th arrow code in 5th file created as shown in the following image
Acme Challenge | Free SSL Certificate
7) Copy the code and run in your terminal/command prompt and copy the return code
8) Paste the code which you got in 7)
9) Click Submit challenge button
10) 11) Similar to 7) & 8)
12) Click on check challenge status if everything is okay then your next step will be activated.
Now get ready for 2/2 challenge as shown in the following image
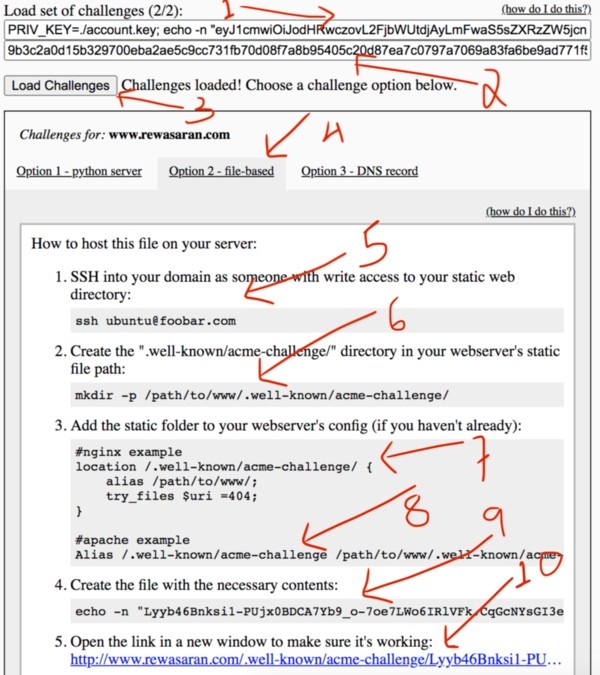
Acme Challenge 2 | Free SSL Certificate
1) Copy the code in your terminal/command prompt and run you will get code
2) Paste the 1) st step code
3) Click on Load Challenges
4) If everything fine then go ahead and click File Based you may use other options too.
5) to 9) go to your cPanel and add the code by creating the file as shown in the following image

Acme Challenge 2 | Free SSL Certificate
10) Once you perform the above step make sure to click on the link which is shown to verify that you have correctly copy and paste the code.
Follow the following image steps to get your certificates
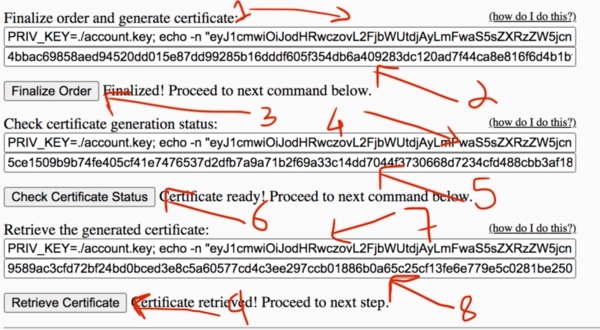
Final Order To Get Certificate | Free SSL Certificate
1) Copy and paste in your terminal/command prompt and you will get code printed
2) Copy and paste the code in 2nd arrow text area
3) Click Finalize Order button to verify
4) & 5) step remains as 1) & 2)
6) Click on Check Certificate Status button
7) & 8) remains same as 1) & 2)
9) Click on Retrieve Certificate button
Okay, now we are in final the stage where we need to install the certificate. Ya, the article has been bit lengthy but worth the effort.
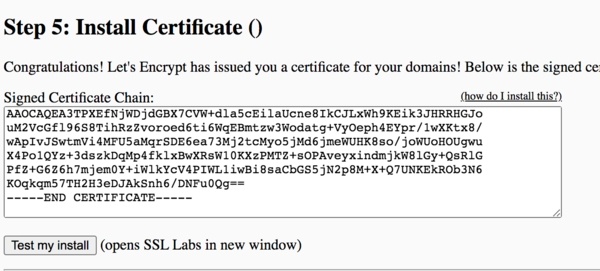
Install Certificates | Free SSL Certificate
Working with this sometimes may cause lot of issues. I highly suggest you to use cPanel for directly modifying the certificates.
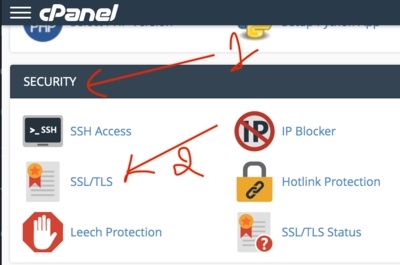
SSL Certificate Installation | Free SSL Installation
1) Scroll to the security section
2) Select SSL/TLS option as highlighted in the above image
After clicking on the above link you will be able to see the following
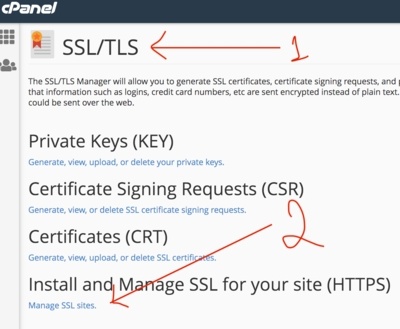
Install or Manage SSL Certificate | Free SSL Certificate
1) Make sure your in SSL/TLS section
2) Click on Manage SSL Sites link as shown in the above image
After clicking on the above link you will be able to see the following page image
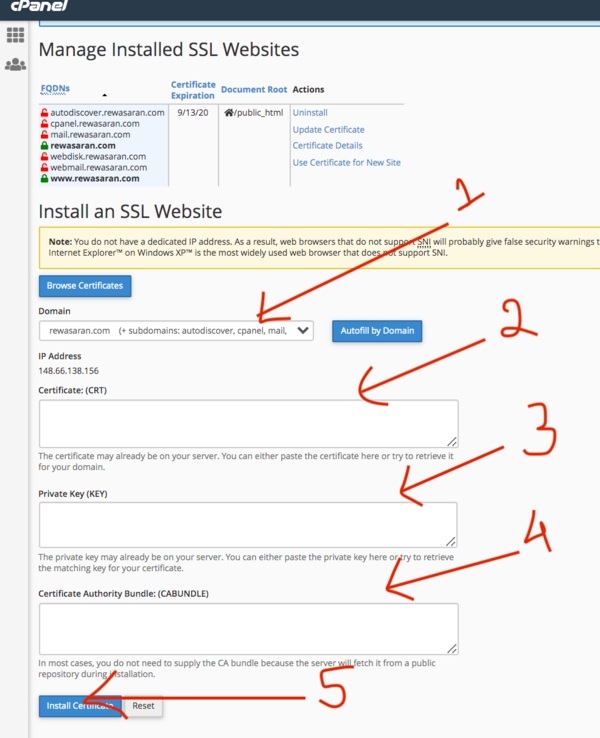
Final Step Of SSL Installation
You can Install/Update the certificates with the same steps as the following
1) Select Domain which you want to install the certificates
2) & 4) You would have got this from the Step 5 - Install Certificate first images page
3) This is nothing but the domain.key which you had created with the commands that you used to run
In your terminal when you run the following command you will be able to see the above key
ls -la
dir
copy the contents of domain.key and paste it to the above section 3 as shown in the image
To copy you can directly open the file and copy or using the following commands
cat domain.key
Open in notepad and copy
5) Once you have filled all your details then click on Install Certificate
.htaccess For HTTP to HTTPS RedirectionNow create .htaccess in your domain root ie public_html or folder where you have the project, ie. where you have placed .well-known folder
.htaccess For HTTP to HTTPS Redirection | Free SSL Certificate
In .htaccess file add the following code
RewriteEngine On
RewriteCond %{HTTPS} off
RewriteRule ^(.*)$ https://%{HTTP_HOST}%{REQUEST_URI} [L,R=301]
This code basically redirects all your HTTP to HTTPS
Hope you enjoyed the article. Please share it with your friends.
composer.json v/s composer.lock
GitHub Login With PHP Laravel Socialite
Simple Way To Create Resourceful API Controller In Laravel
Factory States For Clean And Fluent Laravel Testing
Firebase Cloud Messaging (FCM) Browser Web Push Notifications Using Javascript And PHP
Cache Static Files With NGINX Server
Multiple File Uploads In Laravel PHP
Detect AdBlocker With Javascript And Increase Website Ads Revenue
Client-Side Form Validation With Javascript
Free SSL Certificate With Lets Encrypt/Certbot In Linux (Single / Multiple Domains)


