

Good content takes time and effort to come up with.
Please consider supporting us by just disabling your AD BLOCKER and reloading this page again.


Hello Fellas! If you have any plans to quickly add Comment & Like system with your blog, article, website then this by far the best one and very simple to integrate with Disqus.
We will be covering the following in this article
First, go ahead and register in the Disqus website.
Once you register you will be able to see the following screen to integrate Disqus or comment on Disqus. Go ahead and select I want to install Disqus on my website as shown in the following image.
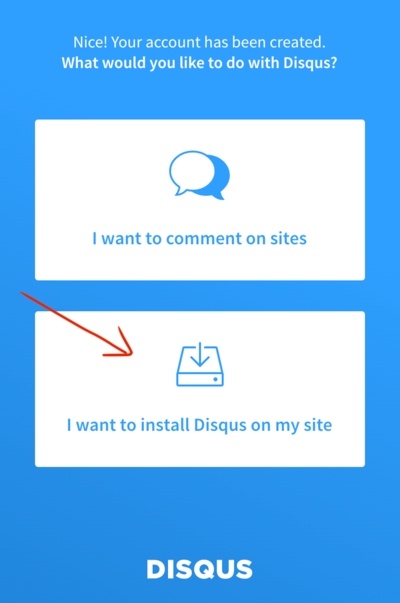
Install Disqus Page
Now add your website details on the following page.
Then click on the Create Site button.
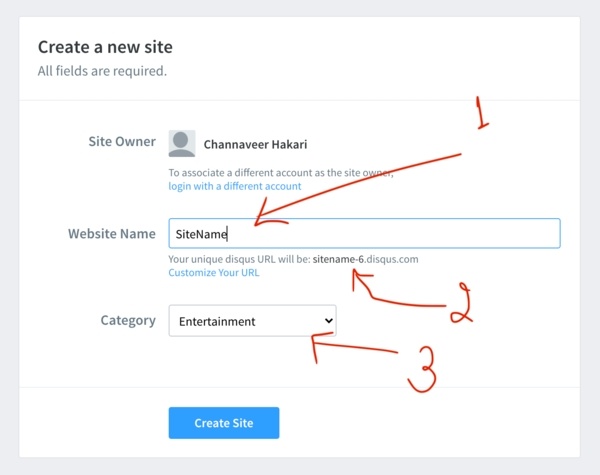
Disqus Add Website Name
Now select the plan which you would like to opt for. If you scroll down you will be able to see the Basic Free Plan.
If you can opt for any of the paid plans then definitely go ahead with it.
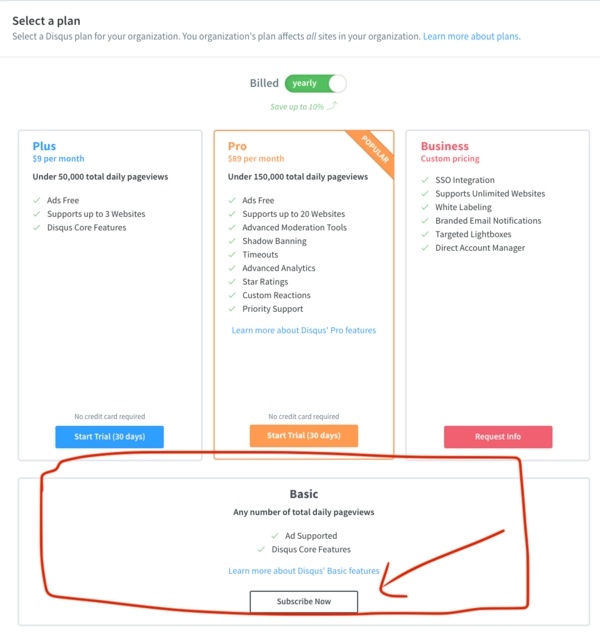
Disqus Select Plan
Now please select the platform that you want to integrate Disqus.
If you scroll a bit down you will be able to select the Manual installation option as shown in the following image.
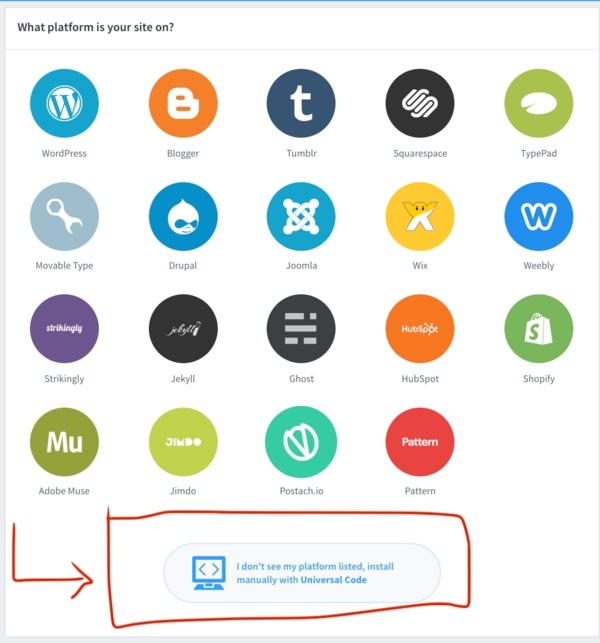
Disqus Select Which Website Integration
On you click on manual installation then you will be redirected to the following page where you will get the integration code as shown in the following image.

Disqus Integration Code
Don't worry I will explain everything in detail. The integration code will look like the following
<div id="disqus_thread"></div>

<script>
/**
*  RECOMMENDED CONFIGURATION VARIABLES: EDIT AND UNCOMMENT THE SECTION BELOW TO INSERT DYNAMIC VALUES FROM YOUR PLATFORM OR CMS.
*  LEARN WHY DEFINING THESE VARIABLES IS IMPORTANT: https://disqus.com/admin/universalcode/#configuration-variables*/

/** Website Comments Configuration */
var disqus_config = function () {
    this.page.url = PAGE_URL;  // Replace PAGE_URL with your page's canonical URL variable
    this.page.identifier = PAGE_IDENTIFIER; // Replace PAGE_IDENTIFIER with your page's unique identifier variable
};

/** Website Configuration */
(function() {
    var d = document, s = d.createElement('script');
    s.src = 'https://WEBSITE_NAME.disqus.com/embed.js';
    s.setAttribute('data-timestamp', +new Date());
    (d.head || d.body).appendChild(s);
})();
</script>
<noscript>
    Please enable JavaScript to view the
    <a href="https://disqus.com/?ref_noscript">comments powered by Disqus.</a></noscript>
Let me break down everything in the code.
<div id="disqus_thread"></div>
Place this HTML code before the closing HTML body (</body>). In this div tag, Disqus will load all the comments.
/** Website Comments Configuration */

var disqus_config = function () {
    this.page.url = PAGE_URL;  // Replace PAGE_URL with your page's canonical URL variable
    this.page.identifier = PAGE_IDENTIFIER; // Replace PAGE_IDENTIFIER with your page's unique identifier variable
};
PAGE_URL - It's a canonical page URL (Canonical is basically the URL of your post, article, or website link which is currently integrating it) and tells Disqus the comments section belongs to.
PAGE_IDENTIFIER - Unique key identifier for the blog post, article, or website link. Basically you must not mess up with this and make sure it remains the same
/* I replaced PAGE_URL & PAGE_IDENTIFIER with my page canonical_link,
   If you dont have canonical_link the replace it with Post URL, Post Slug, Website URL
 */
this.page.url = "{{ $post->meta['canonical_link'] }}";
this.page.identifier = "{{ $post->meta['canonical_link'] }}";
NOTE: If you don't have canonical_link the replace it with Post URL, Post Slug, Website URL
Make sure to change the WEBSITE_NAME with your Disqus URL name. This name you have got it from Step 2 -> Arrow 2 from the image.
/** Website Configuration */

(function() { // DON'T EDIT BELOW THIS LINE
    var d = document, s = d.createElement('script');
    s.src = 'https://WEBSITE_NAME.disqus.com/embed.js';
    s.setAttribute('data-timestamp', +new Date());
    (d.head || d.body).appendChild(s);
})();
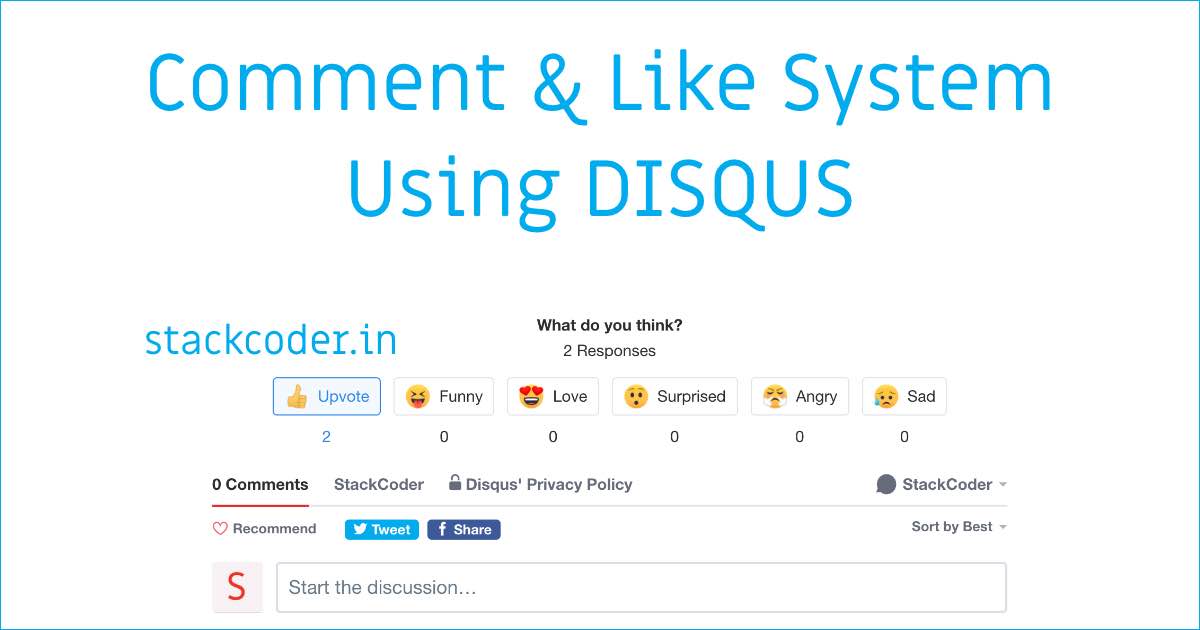
This is the final result after implementation
Disqus Final Result
Hope this article helped you. Please share it with your friends.
Add Analytics To AMP (Accelerated Mobile Pages) HTML Pages
Free SSL Certificate With Lets Encrypt/Certbot In Linux (Single / Multiple Domains)
Comment And Like System Using Disqus
Setup AMP (Accelerated Mobile Pages) In PHP Laravel
Google reCAPTCHA Integration In PHP Laravel Forms
Client-Side DataTable, Adding Super Powers To HTML Table
What Is HTTP? Different HTTP Methods And Status Codes Explained With Examples
Increase Session Timeout In Laravel
Plain PHP Resumable Large File Uploads In Chunks Using FlowJs
What Is Composer? How Does It Work? Useful Composer Commands And Usage
Create Zip File On The Fly With Streaming Download In PHP Laravel


