

Good content takes time and effort to come up with.
Please consider supporting us by just disabling your AD BLOCKER and reloading this page again.


Hello there! I am back with new topic. In this article you will learn how to move your uploaded files from local or server to Amazon S3 bucket.
Code is available in GitHub @ Moving Uploaded Files To Amazon S3 Bucket. Feel free to use modify or share with anyone :)
You will learn how to:
First login to your Amazon AWS account. Once you login you will be able to see AWS Management Console or Click Services on left top of the menu as shown in the following image.
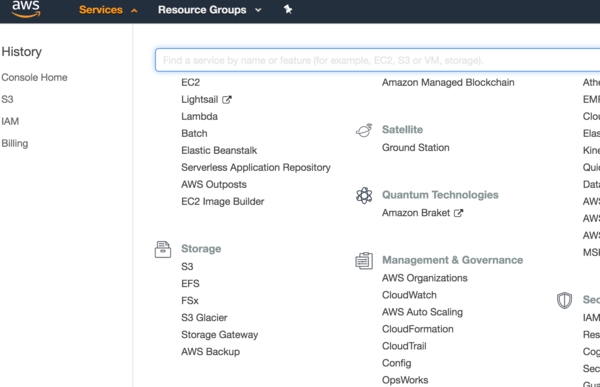
AWS Management Console | Search -> S3
From the above image as shown you can search for S3 or if you scroll bit down you will be able to see Storage -> S3 click on it.
By default you will be able to see list of all your Buckets here. Lets create new Bucket by clicking on Create bucket button as shown in the following image
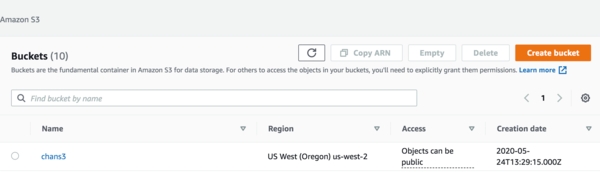
S3 Buckets List | Create New S3 Bucket
After click on the Create bucket button you will be able to see the following form
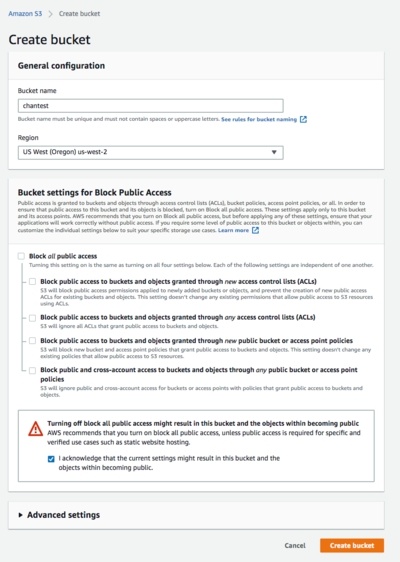
New S3 Bucket Creation Form
Bucket Name - Add your project name of anything you will remember what it is used for.
Region - Select region which is very nearer to the place your providing service.
(Very Important) - Uncheck Block all public access (Make sure to uncheck this if you want to upload images or any files where you want to show publicly. Else in future while fetching your files you will get error)
Check Accept Terms
Click On Create bucket button.
NOTE: Make sure to download the credentials CSV file. As we will use this credentials in Step 3
Tada! Your AWS S3 Bucket is ready.
Lets create project where I wan to use the AWS SDK . Here I am using in Plain PHP, but the code should remain name in any other frameworks like Laravel, Codeigniter, Symfony etc.
Following is my project folder structure. I have already installed composer package. Don't worry I will show you how to run the same below the image
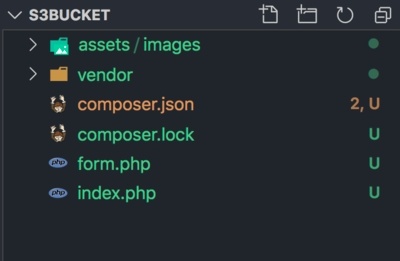
Project Folder Structure
Use the following code to install AWS SDK
composer require aws/aws-sdk-php
Thats it. You have successfully completed one more step. Great going.
Since I am using Composer it will handle autoloading the classes for me just I have to call the autoload.php from vendor folder like the following
NOTE: Most of the explanations I will do in the code snippets so that you can understand very easily
<?php
/** Following line for just debugging the errors if any, but you can omit it out */
ini_set('display_errors', 1);
ini_set('display_startup_errors', 1);
error_reporting(E_ALL);

/** Autoload the file with composer autoloader */
require 'vendor/autoload.php';
While we created our S3 bucket make sure you had download the credentials. As you will need that below
<?php
/** Following line for just debugging the errors if any,
 * but you can omit it out */
ini_set('display_errors', 1);
ini_set('display_startup_errors', 1);
error_reporting(E_ALL);


/** Autoload the file with composer autoloader */
require 'vendor/autoload.php';


/** AWS S3 Bucket Name */
$bucket_name = 'chans3';


/** AWS S3 Bucket Access Key ID */
$access_key_id    = 'your_access_key';


/** AWS S3 Bucket Secret Access Key */
$secret = 'your_secret_key';


/** You can generate random file name here */
$file_name          = 'profile.jpg';


/** Full path of the file where it exists */
$file_location      = './assets/images/'. $file_name;


/** With the following code I am fetching the MIME type of the file */
$finfo              = new finfo(FILEINFO_MIME_TYPE);
$file_mime          = $finfo->file($file_location);


/** Let's initialize our AWS Client for the file uploads */
$s3 = new Aws\S3\S3Client([
    /** Region you had selected, if don't know check in S3 listing */
    'region'  => 'us-west-2',
    'version' => 'latest',
    /** Your AWS S3 Credential will be added here */
    'credentials' => [
        'key'    => $access_key_id,
        'secret' => $secret,
    ]
]);


/** Since the SDK throw exception if any error
 * I am adding in try, catch
 */
try {
    $aws_object = $s3->putObject([
        /** You bucket name */
        'Bucket'        => $bucket_name,
        /** This is the upload file name, you can change above */
        'Key'           => $file_name,
        /** Give the complete path from where it needs to upload the file */
        'SourceFile'    => $file_location,
        /** Keep It Public Unless You dont want someone to access it
         * You can skip the following if you want to keep it private
         */
        'ACL'           => 'public-read',
        /** Make sure to add the following line,
         * else it will download once you use the end URL to render
         */
        // 'ContentType'   => 'image/jpeg'
        'ContentType'   => $file_mime
    ]);


    /**
     * Uncomment the following for debugging the whole object
     */


    // echo '<pre>';
    // print_r($aws_object);

    /** To get the uploaded path of the image you can do 2 ways */

    /** Type 1 - Uploaded AWS S3 Bucket URL */
    echo $aws_object['@metadata']['effectiveUri'];

    /** Type 2 - Uploaded AWS S3 Bucket URL */
    echo $aws_object['ObjectURL'];

    /****** SAVE THE ABOVE PATH IN YOUR DATABASE FOR FUTURE REFERENCE ******/

} catch (Aws\Exception\AwsException $e) {
    /** Handle the error if any */
    return 'Error: ' . $e->getAwsErrorMessage();
}
When you dump the above $aws_object variable for the debug purpose you will be able to see similar to the following output
Aws\Result Object
(
    [data:Aws\Result:private] => Array
        (
            [Expiration] =>
            [ETag] => "c7161dd38b84e8fea7f778a349882fa7"
            [ServerSideEncryption] =>
            [VersionId] =>
            [SSECustomerAlgorithm] =>
            [SSECustomerKeyMD5] =>
            [SSEKMSKeyId] =>
            [SSEKMSEncryptionContext] =>
            [RequestCharged] =>
            [@metadata] => Array
                (
                    [statusCode] => 200
                    [effectiveUri] => https://chans3.s3.us-west-2.amazonaws.com/profile.jpg
                    [headers] => Array
                        (
                            [x-amz-id-2] => W5aSkTIf24p8d074+pgHQs9JAxTah7JIGBWXG5RpF9IUFoNKC46bcyuzsVNp2jJsjff89Bw4W3Y=
                            [x-amz-request-id] => 75669CA75B12E083
                            [date] => Sun, 24 May 2020 16:33:00 GMT
                            [etag] => "c7161dd38b84e8fea7f778a349882fa7"
                            [content-length] => 0
                            [server] => AmazonS3
                        )

                    [transferStats] => Array
                        (
                            [http] => Array
                                (
                                    [0] => Array
                                        (
                                        )

                                )

                        )

                )

            [ObjectURL] => https://chans3.s3.us-west-2.amazonaws.com/profile.jpg
        )

    [monitoringEvents:Aws\Result:private] => Array
        (
        )

)
Observe the following paths from the above code ie
/** You can generate random file name here */
$file_name          = 'profile.jpg';


/** Full path of the file where it exists */
$file_location      = './assets/images/'. $file_name;
Here I have hardcoded in the next step I will explain how you can dynamically set it.
You saw the hard coded way, you might be having some script or something which will pull all the details of the same from database. We can do it as follows.
$products = 'YOUR QUERY FOR PRODUCTS';

foreach($products as $product){
  /** Your image might be something like this */
  /** similar to
   * $file_name = 'profile.jpg';
   */
  $product_image = $product->image_name;

  /** Your upload file path might be like */
  /** similar to
   * $file_location = './assets/images/'. $file_name;
   */

  /** Upload path in project uploads */
  $upload_path = './uploads/images/product_images/';

  /** Upload path in some API domain */
  $upload_path = 'https://your_api.com/uploads/product_images/';

  /********* REST OF THE CODE REMAINS SAME AS ABOVE **************/
}
In the above code the $upload_path I have shown 2 examples you can choose the one you wanted.
Hope you enjoyed the read. Feel free to shoot your messages in comments.
I have uploaded the whole project in GitHub @ Moving Uploaded Files To Amazon S3 Bucket please feel free to use
Why And How To Use PHP PDO With CRUD Examples
Why You Should Run Cronjobs In Laravel?
What Is Laravel Resourceful Controllers?
Multiple GIT Key Pairs Or Account In The Same Computer
Resolve 404 Not Found In NGINX
Free Live Chat Integration Using TAWK.IO
Composer Install v/s Composer Update
Firebase Cloud Messaging (FCM) Browser Web Push Notifications Using Javascript And PHP
Laravel Custom Maintenance Page
SummerNote WYSIWYG Text Editor
Laravel Clear Cache Of Route, View, Config Command
Sass or SCSS @mixin vs @extends vs Placeholder (%)


